How To Get Your Webcam Microphone To Work
Step 1: Verify your microphone is enabled
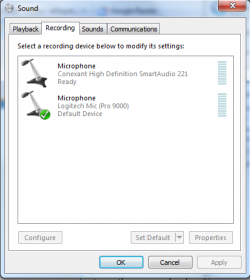
Click on Control Panel, Hardware and Sound, Sound, Recording. You should see your microphone icon with a green check mark on it. If there is no green check mark, it means it is disabled. If there is no green mark on the microphone then it work pick up any sound.
Step 2: If Needed, Enable Your Microphone
To enable the microphone right click on Microphone and click on Enable. If you do not see the microphone in the list, right click on the White Space and select Show Disabled Devices. Then you will see the microphone. However, if you do not see the green check mark on it, right click on it and click on Enable. If the Set As Default button is active click on it.
Once you see the green check mark on the microphone it is ready to use.
Step 3: Increasing Microphone Sensitivity and Un-muting the Microphone
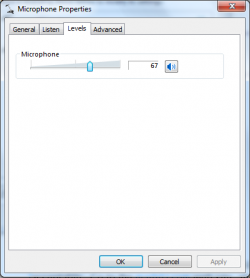
1. Select Microphone and click on Properties button.
2. Adjust the slider to the right, up to 100 % of its range.
3. If Mute is on, click the mute button to un-mute the device.
4. If Microphone Boost is available, boost the volume.
5. Click OK to make the changes.
Now the Microphone should work.
To enable the microphone right click on Microphone and click on Enable. If you do not see the microphone in the list, right click on the White Space and select Show Disabled Devices. Then you will see the microphone. However, if you do not see the green check mark on it, right click on it and click on Enable. If the Set As Default button is active click on it.
Once you see the green check mark on the microphone it is ready to use.
Step 3: Increasing Microphone Sensitivity and Un-muting the Microphone
1. Select Microphone and click on Properties button.
2. Adjust the slider to the right, up to 100 % of its range.
3. If Mute is on, click the mute button to un-mute the device.
4. If Microphone Boost is available, boost the volume.
5. Click OK to make the changes.
Now the Microphone should work.
Step 4: Test Your Webcam Audio Level
Now that your microphone is enabled, and levels have been set, it is time to test it to verify the sound level is acceptable. Go to the mailVU.com web site, allow access to your webcam, and then make a short recording. Be sure to speak in a normal voice level and talk directly into the webcam. A 20-30 second recording will be sufficient. Now click the Play button and observe the audio level. Keep in mind that your speaker level will determine how loud it plays on your computer, so be sure to set your speakers to 1/3 to 1/2 loudness level.
Now that your microphone is enabled, and levels have been set, it is time to test it to verify the sound level is acceptable. Go to the mailVU.com web site, allow access to your webcam, and then make a short recording. Be sure to speak in a normal voice level and talk directly into the webcam. A 20-30 second recording will be sufficient. Now click the Play button and observe the audio level. Keep in mind that your speaker level will determine how loud it plays on your computer, so be sure to set your speakers to 1/3 to 1/2 loudness level.
